Caramelised Fruit (but no nuts) Tart

I’ve looked at the picture of these tarts in the Hummingbird Bakery recipe book for so long; I’ve even bought the tart tins in preparation of making it … but I’ve never gotten round to it.  Why? Well it’s a mixture of I’m terrified of anything pastry-related and it takes a long time to make.

So why make it now? Well I had a spare Sunday and I was determined to do at least one pastry dish by the end of the year – otherwise I’m just a baking pansy! So I went out and got all my ingredients together, poured myself a glass of wine (for some Dutch courage) and I was on my way.

The pastry was made by whisking together the butter and flour and adding the sugar and egg. Once this started to turn into a dough I kneaded the mix to ‘bring it together’.  Now I’ve watched a lot of Great British Bake Off and I know all about over-kneading pastry … I have no idea what constitutes over (or under) kneading. Hmmm … I made a not-so-educated guess, wrapped it in cling film and put it in the fridge for 30minutes.

A glass of wine and an episode of Friends later I brought out the dough, cut it in half, put one half back in the fridge and started to roll out the other half to line my pre-greased tart tins.  The recipe says to roll out the pastry to 5mm but I managed to roll it out too thin on my first two attempts.  I also found that the pastry ripped really quickly and have no idea whether it’s due to under (or over) working the dough.

Thankfully I started to get the hang of working with the dough and managed to line all eight tins, the last one being much more professionally done than the first!  These went back into the fridge for another 30 minutes before they were lined with greaseproof paper, covered in baking beads and cooked for 10 minutes in the oven.

The baking beads are then removed and the tarts went back in the oven for another 10 minutes to turn a light golden brown colour. Once these were out and cooling, I got started on the filling.


Reading this recipe again, I’ve realised that the title is ‘Caremalised Fruit AND Nut Tarts’.  Clearly in my eagerness to get underway, I completely missed the nut part of the recipe.  I had bought tons of dried fruit but no nuts! Ah well. I measured out all the drived fruit and chopped up the dried apricots so that it wouldn’t look too bulky.

On to the caramel – if you’ve ever made caramel before you’ll understand the incredible, almost-impossible-to-deny temptation to stir the sugar and water while it’s boiling.  It’s unbelievable how stir-able that mixture looks bubbling away. I measured the double cream and butter to stop myself stirring it and it still wasn’t enough to distract me. I literally stood there staring at the caramel praying it would turn golden brown before I gave into temptation.

It did (thankfully) and from watching the Great British Bake Off I learnt to dunk the bottom of the pot into cold water – this stops the caramel from continuing to cook after you’ve taken it off the heat and greatly reduces the chance of burning it.

After cooling for a little while the double cream and butter was stirred into the mixture and poured on top of the dried fruit.  Once this was all mixed together, the dried fruit was separated between tart tins and put in the fridge for an hour to set. There seemed to be a LOT of fruit in comparison to the amount of space in the tarts, but I stuck to the recipe and created nice ‘mounds’ of filling.


Just before serving, I whipped up some more double cream to go with the tarts and brought it out after dinner with some tea. They went down really well with the family, it’s a really rich dessert and would make a really nice end to a posh dinner party.

I, however, found it a bit too rich and too sweet. OK so I put 100% dried fruit in there instead of a mixture of fruit and nuts, but I think the outcome would have still been too rich for me.  The pastry was lovely (and there were no soggy bottoms or breaks!); I think I’ve finally faced my fear and I’m already planning to try out some more recipes. I’d actually love to try this recipe again but with sliced bananas instead of dried fruit, as I think this would be heavenly.

Easy Breezy Lemon Squeezy Cheesecake

This is my first Mary Berry Cheesecake, and in true Diary of a Bake-A-Holic style I looked for the easiest one possible. The name of this recipe therefore made the choice ridiculously easy for me.

 I went out specifically to buy some condensed milk and got a tiny bit carried away with all the recipes on the tins. About 20 minutes later I realised what I was doing and grabbed the first tin of condensed milk I saw and dashed home to start baking.

The base of the cheesecake consisted of digestive biscuits, melted butter and a bit of Demerera sugar.  I was determined not to have any big lumpy bits of biscuit so whipped out the pestle and mortar and ground my way through the pack. Naturally one or two had to be eaten along the way – for quality assurance, of course.

I finally managed to get all the biscuits crushed and mixed with the butter and sugar, squished the somewhat dry mixture into the bottom of the cake tin and got it into the fridge to cool while I worked on the next layer. Mary Berry, I hope you know what you’re doing with these crumbly bases!

Then came the hard part – grating lemon zests! Over the course of this blog, I have realised that it is impossible for me to grate anything without injuring myself. I have therefore come up with a fool-proof plan to get it done without any type of injury … bribe someone else to do it. This time, three lemons were grated by a loving father, who received tea and a digestive biscuit for his troubles (thanks dad!).

With the hardest job out of the way, I set about measuring out the cheese, single cream and condensed milk ready to be mixed.  This is where I encountered a slight hitch … my condensed milk was actually ‘caramelised’ condensed milk.  Oops. I had been so engrossed in the recipes on the sides of the tin I didn’t bother to look at what I was buying! I rushed to the shops again while I fogged off a ‘digestive biscuit covered with caramelised condensed milk’ snack onto my family (which, I’d like to point out, is very tasty!).

Once back, I whisked everything together and attempted to spread the mixture evenly on top of the biscuit base.  This went in the fridge overnight and the bowl was taken away by the family to be ‘taste tested’ – a term I wish I didn’t teach them!

After a hectic day the next day I came home to a family sitting expectantly and waiting for me to get the cheesecake out; when I say ‘sitting expectantly’, I actually mean they were glaring at me and pointing at the kitchen as soon as I walked through the door (charming aren’t they?!).

 In my rush to get home I managed to buy double cream instead of whipping cream but I figured it was all relative and started to whisk it anyway. It didn’t help that I didn’t whisk it as much as I probably should have – but I put this down to pressure from the evil glares I was getting for taking so long. A few slice strawberries later and ‘et voila’, we have an Easy Lemon Cheesecake ready to be served.

Once everyone had had their first piece and stopped glaring at me, I could tuck into my own slice of cheesecake. Oh my, Mary Berry, you have done it again! The biscuit base was delectable – the Demerera sugar adds a lovely sweet crunch to it all.  If that wasn’t enough the actual cheesy part – I dribble just thinking about it.  It was very sweet, which may not be to all tastes, but is definitely to mine.  It wasn’t sickly sweet however, but was light and creamy, with the lemon cutting through the sweetness perfectly.


Basically this is a delight of a cheesecake.  The only downside was that the double cream made the cake look a little runny, but this is only an aesthetic hitch and thus shouldn’t count in any way. OK, so looks count a bit but it tastes so good that frankly, no one cared.

Famous Key Lime Pie

With every new season of  ‘The Great British Bake Off’ I get inspired to bake something new. This season was no exception to the rule and I was determined to bake my first ever pie.  Not any old type of pie, but the now famous Key Lime Pie.

 I have to admit that I was grossly unprepared for such a task, to the extent that I went to my local baking retailer and said: “I’m baking a Key Lime Pie, what do I need?” After a look of pure disbelief, the assistant actually managed to figure it out for me and I left with a brand spanking new pie dish and baking beads. I even bought a zester, so that I might be able to zest the limes without injuring myself.

I was ridiculously excited, and immensely terrified at the concept of making pastry … until I got home and realised the Hummingbird Bakery uses digestive biscuits instead.  Ah well. I set my baking beads aside and got started.

The base is essentially just crushed up digest biscuits with butter and is squished into the bottom of the pie dish and cooked for 20 minutes.  Everything was going great but I had a sneaky feeling that my pie dish was too small, I bought the recommended 23cm but it seemed to be a LOT of base for the amount of space there was.

Once baked, I set the base by the window to cool quickly while I got started on the main part of the pie.  This consisted of lots of egg yolks (the whites were swiftly turned into a yummy omelette), condensed milk, and lime zest and juice.

Here is where I messed up.  I started to use my great new zesting gadget and quickly realised that: 1. The recipe says grated. 2. My new gadget was making really big, thick bits of zest.

I didn’t think too much about it at the time and continued to mix everything and pour it into the cold pie crust.  I definitely bought the wrong size pie dish as about a quarter of the filling was left after the pie was filled to the top.  Oops. Afraid to risk it, I set the extra aside and cooked the pie in the oven for about 30minutes.  I was very careful to keep it in long enough so that it wouldn’t be classed as ‘wobbly in the middle’ but also wouldn’t overcook.

Once out the oven I left it to cool and chilled it in the fridge for 24 hours before serving up with cream and a little more lime zest.

So all that’s left to talk about is the taste. What can I say about this pie that will make you believe how unbelievably tasty it is! There aren’t many words that can express how good it tasted: zesty, creamy, light, delectable … GORGEOUS! Let’s just say that there is a reason the ‘British Bake Off’ judges named it one of the tastiest things they’ve had in the entire programme!

Banana and Honey Teabread

It was my colleagues last day yesterday (SOB!!) and I had promised her I’d make her a cake.  I originally planned to make a rocky road but after reading the ingredients list I decided it was a glorified lump of chocolate and refused to serve up a potential heart attack to my office.

I therefore opened up my trusty Baking Bible and found this recipe.  I was intrigued by the whole concept of a teabread – is it a bread you have with tea? Is it a loaf? What is it? My curiosity got the better of me and I got out all the ingredients ready to bake.  This time I even managed to grate the lemon myself (huge progress!).

The recipe is a bit different to what I’m used to, in the sense that you mix the flour with the butter and nutmeg first with your hands. Then came the eggs, mashed banana, sugar and a LOT of honey – yum!

This went into the prepared loaf tin and into the oven for about an hour and 25 minutes.  Here is where I messed up. Technically it wasn’t my fault; I put complete blame on my fan-assisted oven. I left an overlap of baking parchment on either side of the cake tin to make it easier to lift the cake out but when I put it in the oven, the fan must have blown one side over to cover the batter.  This meant that it stuck to the parchment and didn’t bake as well. I had to bake it for even longer and tried to peel away the parchment without taking half of the cake.

Once out, the smell was ridiculously tempting– so much so that I may have scraped bits of cake from the parchment paper to eat. I waited till the cake completely cooled before I heated up two more tablespoons of honey and drizzled it over the top.  I didn’t particularly like the idea of having big sugar lumps on top of the cake so I crushed mine before sprinkling.

Once in the office, the teabread didn’t last very long but I did manage to get a photo or two before it all disappeared. I had my customary taste test (the best job/excuse to eat cake ever) and decided that this is probably one of my favourite loaf cakes/tea cakes.

It is beautifully moist and sweet – but not your average ‘sugary sweet’ – the honey adds a texture and taste that is even better than ‘sugary sweet’.  The nutmeg gives a small kick that also works really well with the banana.

My lovely colleague, Grace, made some Hummingbird Bakery Brownies with cherries and almonds on top.  These were delicious and I devoured as many as possible before they disappeared.  If only I knew she was a baker I would have made her bake more!

A Carrot Cake … With Lots of Banana?

I’m an office feeder. Yes, I know it’s shameful.  I make lots of treats and I take them to work for everyone to eat; it’s gotten worse since my family decided to become healthy and reject my baking. However, I eat as much baked goods as everyone else so I could say I’m not as bad?!

Anyway, my colleague requested a carrot cake for his birthday and I just couldn’t say no. I’ve already tried my hand at the carrot cake from the Hummingbird Bakery recipe books, so I thought I’d give Mary Berry’s Baking Bible a go, as it’s on a great running streak.

So I prepared my cake tin the Mary Berry way, (lining it with greaseproof paper) and turned my oven on. To save time I bought chopped walnuts from the supermarket, I admit it’s ridiculously lazy but it was definitely worth it.

What confused me most in this recipe was the amount of banana used, there was actually more banana than carrot! I used the tiniest two carrots I could find and I still had to eat half of one; but I used 2 large bananas. I was starting to question Mary Berry’s methods but I kept going – I figured at worst it would be a nice twist on a carrot cake.

Once all the ingredients were grated, mashed and whisked I poured the batter into the prepared dish and cooked it for the recommended time.  The cake had risen beautifully when I took it out too cool. The smell managed to send my entire family into the kitchen, scavenging for a slither of cake.  I had to hit hands with the spatula and bribed them with berries and cream cheese icing to keep them away!

It was pretty late the time I had finished baking and preparing the icing and I was still waiting for the cake to cool completely.  My need for sleep increased drastically and I resorted to spreading the icing on a semi-warm cake and quickly put it in the fridge to stop the icing melting/dripping etc.  Now I know this is blasphemous in terms of baking but sleep comes first for me!

I woke in the morning to find that it didn’t run as much as I thought it would. I wacked on a few walnuts, and whisked it off to work, where it was demolished before I could take any proper photos – damn.

  The cake tasted great – which was insinuated by the speed at which it disappeared. I’m generally not the biggest fan of using oil in cakes as I can always taste it but version of the carrot cake managed to hide it well and the banana added a lovely moistness to the sponge.

All in all a great recipe, Mary Berry hits the nail on the head again. I promise I will not doubt her ever again!

Limes … in Cookies … Hmm …

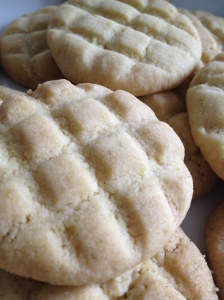
I was looking for something really quick and easy to bake this weekend and came across this recipe for Lime Lattice Cookies in Mary Berry’s Baking Bible.  To be honest I was quite sceptical about it all; now I’ve had a really good run so far with Mary Berry’s recipe’s but lime and cookies? … Really?

There were so few ingredients involved and the recipe seemed really easy so I couldn’t help myself; I decided to give it a go. All I had to do was cream some butter and sugar (easy enough) and mix in self-raising flour (can’t mess that up right?!) and lime zest (dammit!).

I hate grating – well, pretty much anything – but limes are by far the worst! They just don’t want to be grated! After much huffing and puffing – and the odd five injuries – I managed to get two limes grated and ready to put in the mix.

Here is where I have to make a confession – the recipe is enough to make 16 cookies; so … I measured the dough exactly and separated it into 16 exacts parts (that’s 17grams each). I realise the sheer geekiness and perfectionist nature of this and all I have to say is – I’m a geek, and I like to have cookies that are all the same shape. And What?!

Now this is where the recipe stumped me a bit; Mary Berry says to create a lattice pattern using a skewer – great, I have the skewer … now what in the heck is a lattice pattern?! (I do admit that this is another confession that I probably really shouldn’t reveal to the world via a food blog!) But Google, as always, provided me with an answer and I set to work.


The now lattice-patterned cookies went into the oven for about 15minutes, and came out just as they were turning golden.  This is the worst part about baking cookies.  You’d think it would be simple to know when the cookies are ‘almost golden’ but I’ll have you know that there are many different shades that fall under that category.

Once the cookies were out, I managed to wait twenty minutes before I had to give one a taste test; I was just too intrigued to wait!

And the verdict is … yum! The cookies have quite a crumbly texture and the lime adds a really nice sharpness to it, which isn’t overwhelming at all.  Altogether, they’re a great, quick and easy recipe for pretty much any occasion – did I mention that they look really good too?

The Super Breakfast Smoothie

I don’t do too well with cereals in the morning; I get bored very quickly and so full that I need a nap about ten minutes after.

So you can imagine that when I came across this concoction, I immediately fell in love. Unfortunately, I owe my brother for this one, so I’ll have to bake for him at some point to say thanks, but it’s still worth it.

I generally don’t use milk unless I’m baking, I’m a huge fan of oat milk (see picture below) or almond milk so tend to opt for either. The recipe works just as well with normal milk so swap it round if you prefer.

The smoothie is meant to be quite thick but again, dilute to taste. This is how I make mine…

INGREDIENTS

  • 1 medium sized banana
  • 2 large handfuls of any fruit you like (this time I used strawberries and pineapple)
  • 2 heaped tablespoons of rolled oats
  • 1 tablespoon honey
  • 200ml of oat drink (or any type of milk you prefer)

RECIPE

  1. Peel and chop all the fruit and bung it in the blender.
  2. Add everything else and blend away.
  3. Add more milk to taste (if you like it thinner)
  4. Drink and enjoy.
I absolutely love this as a breakfast and have had it everyday for ages.  You can literally use any type of fruit (I’ve even used orange segments); it always tastes great and fills you up straight through to lunch time.

Why Is It Called Madeira?

This is the first question that came to mind when I made this cake.  At first I figured it must come from the Madeira Islands … apparently not! According to the internet (i.e. Wikipedia), the recipe originated in England in the 18th/19th century and was named after Madeira wine, which was served with the cake and popular at the time. Huh … You learn a new thing every day.

History lesson over, I chose the recipe because I was intrigued by the amount of ground almonds it used … OK, you got me, I actually picked it because I had nothing else in my cupboard and this cake doesn’t need anything random!

So I turned on my oven and prepared my cake tin with greaseproof paper (the typical Mary Berry way).  The recipe said to bung it all in and mix it – which I’m very wary of – so I used my standard method.  I firstly beat together the butter, sugar and lemon and added in the eggs.  Then I added the almonds and sifted the flour before mixing for a bit longer till it all came together.

This went into the tin and in the oven for around 30 minutes.  The recipe then says to take the cake out and put some citron peel on top before putting it back in for another 10-15minutes. Naturally I didn’t have any, in fact, I didn’t know what it was and guessed it to be any citrus type fruit. So…  I used some orange peel … Ah well!

Once the cake was ready and the kitchen smelt like roasted almonds, I took the cake out to cool and served it up with tea (obviously I didn’t know you had to serve it with wine at the time).


The cake is actually really delicious, it’s quite dense and could potentially be mistaken for dry; it actually reminded me of a few Iranian desserts, which are meant to be accompanied with a drink – normally tea. The almond wasn’t overwhelming but complimented the cake really well. Mary Berry does it again, she’s fast becoming my favourite cookbook.

Better Than A Terry’s Chocolate Orange.

I flaked on going out with a friend the other week and promised I’d make it up to him. He decided it that I could make it up by baking something with chocolate and orange. This was when a little light bulb turned on in my head and I remembered a recipe in the Hummingbird Bakery book for Chocolate Orange cupcakes.

The surprising thing about this recipe, however, was that it also used vanilla essence … hmm. I have to admit I was a bit sceptical while making the cupcakes, I thought there would be too many different flavours going on.  But, as always, I put my trust in the Hummingbird Bakery and powered through.

The cupcakes were made in the standard Hummingbird way, mixing all the ‘wet’ ingredients e.g. butter, sugar, eggs, vanilla essence etc. with all the ‘dry’ ones.  Once everything was incorporated and the batter was smooth. I used smaller, UK sized cupcake cases and managed to get 24 cupcakes out of the batter.


After twenty minutes in the oven, out came some great smelling, and perfectly flat cupcakes.  I was so happy! It’s been ages since they’ve come out looking so nice.

I let them cool and made up the icing, which consisted of icing sugar, butter, cream cheese, orange zest and cocoa powder.  Now I’ve finally learnt that you can’t pipe icing with any bits in it, no matter how well you mix it. So I went for the typical Hummingbird Bakery swirl and put a few chocolate stars on each to decorate.


A box of these cupcakes went to work with me the next day, as I seriously doubted my friend could work his way through 24 of them.  I got to work at 9am with the intention not to try one, but I caved by 11am and had a cupcake with my tea, for taste testing reasons, of course.

Now I’ve never actually had a Terry’s Chocolate Orange, but the cupcakes taste exactly how I imagine them to be.  A colleague actually said they tasted better, and another described the cupcakes as ‘heaven’.  Well, you can’t get a compliment better than that!

Personally I really liked the taste and was pleasantly surprised that all the different flavours worked so well.  The vanilla essence actually helped to develop the orangey flavour.  The icing is beautifully smooth and unbelievably tasty.  Definitely one to bake again!

Carrot and Orange Loaf … The Mary Berry Way

I’m still addicted to Mary Berry’s Baking Bible, and wanted to try out another recipe from the book. I decided on the Carrot and Orange Loaf for two reasons: 1. I wanted to see what a crazy combination like carrot and orange would taste like, 2. I’ve never made a carrot cake with butter instead of oil.

The biggest problem I have with the recipe book is that not all the recipes have a photo of the finished product. I normally use the photo most to see what it’s meant to turn out like so had a bit of a freak out when I didn’t have one to use.  However, I turned to my trusty friend, Rising To the Berry, who is going through all the recipes in the book and, thankfully, she had already done this one.

Now, being the geek that I am, I’ve read all the baking tips at the front of the book and decided to try out her way of preparing a loaf tin.  It was essentially greasing the tin all up and cutting a piece of greaseproof paper that is the same size as the length of the of the longest side and leaves an overlap (see photo below).


After that was done I set about grating the carrots and boy, were there a lot of carrots to get through. I’m generally rubbish at grating things; normally I end up having about 10 cuts on my fingers from where I got excited but this time I did quite well, I only had three.  I consider that huge progress.

Once the carrots were done I grated the orange rind and cut away the pith (which is the white part of the skin – yes, I actually had to Google it!) before slicing it.

Finally I set about making the batter; the recipe says to bung it all into a bowl and mix it up. I tend to find that I over mix the batter quite when I do it this way so I started by mixing the butter, sugar, rind and carrots; before mixing in the eggs and finally the flower baking powder and spices.  I also added a tablespoon of milk, as the batter was quite thick.

The mixture went into the cake tin and into the oven for about 45minutes.  I took it out when it was just firm and put the slices of orange on the top and drizzled some honey on top of that. This went into the oven for a further 15minutes.

I have to say, when I took the loaf out of the oven I was insanely proud of it, and therefore of Mary Berry.  The loaf came out perfectly.  Furthermore, the new way of lining the loaf tin made it so much easier to take the cake out. You literally just lift it out and hey presto… perfect loaf!

I managed to hold my family off eating the loaf until after dinner and I tell you, it was definitely worth the wait! It was beautifully moist and the carrot and orange flavour actually worked really well.  Also, I find a lot of carrot cakes are quite oily so it was really nice to not have that. All in all, a definite great recipe; Mary Berry is on a good streak!